Understanding an ACL Tear
The anterior cruciate ligament (ACL) is one of the main ligaments that stabilize the knee. It helps keep the shin bone (tibia) from sliding forward and allows safe cutting, pivoting, and jumping. ACL tears may not hurt after they are initially injured, however they will often result in a sensation of being “unsteady” with twisting and turning.
How ACL Injuries Happen
ACL tears most often occur with:
- Sudden stops or changes in direction
- Twisting or pivoting motions
- Landing awkwardly from a jump
- Falls in sports like skiing
Patients often feel or hear a “pop”, followed by:
- Rapid swelling (usually within a few hours)
- Pain with walking
- A feeling that the knee is unstable or “giving out”

Associated Injuries
ACL tears can occur along with other damage inside the knee, including:
- Meniscus tears (shock-absorbing cartilage)
- Articular cartilage injury (joint surface damage)
These injuries can lead to pain, stiffness, swelling, and, over time, arthritis.
Other ligaments may also be injured:
- MCL (inner ligament): often heals without surgery
- LCL (outer ligament): may require surgical repair
What Happens Without an ACL?
If the ACL alone is torn, swelling and pain often improve over 6-8 weeks, and the knee may feel normal during straight-line activities.
However, without an ACL:
- The knee may give way with pivoting or sudden direction changes
- Repeated instability can lead to further damage inside the knee
Do You Need Surgery?
Not all patients need ACL reconstruction, however a thorough discussion with Dr. Ford is important to understand the risks and benefits of both surgery and non-operative management.
Non-surgical treatment may be reasonable if:
- You are less active
- You do not participate in cutting or pivoting sports
Surgery is typically recommended for:
- Athletes or active individuals
- Patients with repeated instability
Non-Surgical Management
If surgery is not performed:
- Avoid high-risk activities (e.g., basketball, soccer, football)
- A brace may provide some support (but not full stability)
- Physical therapy can improve strength and control
Even with good rehab, the knee may still give out unexpectedly.
Timing of Surgery
ACL surgery is usually delayed about 4-6 weeks after injury to:
- Allow swelling to decrease
- Restore full motion
- Reduce the risk of stiffness after surgery
Early surgery in a stiff, swollen knee can lead to poor outcomes.
Early Treatment After Injury
Initial management focuses on protecting the knee:
- Use ice to reduce swelling
- Use crutches until walking comfortably
- Gradually work on restoring motion
Strengthening exercises are typically delayed early on to avoid irritating the knee.
When Is Early Surgery Needed?
In rare cases (such as knee dislocations or multiple ligament injuries), surgery may be recommended sooner. Dr. Ford will discuss this if it applies to you.
What type of Graft is used for my ACL surgery and are there Risks?
There are multiple-graft choices available to reconstruct your ACL. In younger patients it is preferred to use your tissue (autograft) for the reconstruction. In older, less active patients, a cadaver graft (allograft) may be used. The most common grafts used are:
- Quadriceps tendon
- Bone-Patella-Bone Tendon (kneecap tendon graft)
- Hamstring tendons
The decision on which graft to use will be discussed with Dr. Ford and the selection will be made to give you the best possible outcome for success.
The risks of ACL reconstruction include but are not limited to:
| Permanent numbness by the incisions | 100% |
| Other nerve injuries | 0.5% |
| Patellofemoral pain (knee cap) or thigh pain | 5% |
| Stiffness or reduced motion of the knee | 10% |
| Re-injury | 5-10% |
| Superficial infection | 1% |
| Deep infection | 0.5% |
| Blood clots | 2-3% |
| Delay in regaining motion | 25% |
How soon will I…?
Return to work
| Sedentary | 1-2 weeks |
| General office | 2-3 weeks |
| Light physical | 6-8 weeks |
| Medium | 3 months |
| Heavy | 4 months |
Return to sports
| Normal walking/stairs | 1-2 months |
| Light individual sports | 3-4 months |
| Running/jumping | 6 months |
| Contact/high performance | 9-12 months |
Phase I: Immediate post-op phase (0-2 weeks after surgery)
Goals
- Protect the reconstruction
- Ensure wound healing
- Attain and maintain full knee extension
- Gain knee flexion (bending) to 90 degrees
- Decrease knee and leg swelling
- Promote quadriceps muscle strength
- Avoid blood pooling in the leg veins
Activities
- Brace/crutches/weight bearing: your knee brace is set to allow you to bend and straighten your knee at rest. Use it when walking or out of bed, but it may be removed for range of motion exercises.
- Post operatively you will be on crutches for 2 weeks and use the knee brace for 4-6 weeks. The amount of weight you can put on your leg will be discussed with you by Dr. Ford and depends on if other injuries were fixed in your knee during the surgery.
- Beginning post operative day 0, you will remain in the knee brace, locked in extension for 2 weeks when walking with your crutches. You will only come out of the brace for range of motion exercises. At the 2 week mark the knee brace hinge. How far you are allowed to bend the knee at that time will be explained to you and again is based on if other injuries were fixed during surgery (such as your meniscus).
- Your therapist will demonstrate the proper form for walking with crutches:
- Put the crutches forward about one step’s length
- Put the injured leg forward in line with the crutch tips
- Touch the foot of the injured leg to the floor and put as much weight down as is comfortable (brace on and locked)
- While bearing weight on the injured leg, take a step through with the uninjured leg.
- It is okay to remove your bandage on the second morning after surgery to shower. It is recommended though to re-wrap the elastic bandage (ACE wrap) around the knee at other times to control swelling and to keep the brace from rubbing on the incisions. Do not soak the incision in a bathtub or hot tub until the stitches have been removed.
Exercises
Program: 7 days per week, 3-4 times per day.
| Quadriceps setting | 1-2 sets | 15-20 reps |
| Heel prop | 5 minutes | |
| Heels slides with towel assist | 5-15 minutes | |
| Sitting heel slides | 1-2 sets | 15-20 reps |
| Straight leg raises | 1-2 sets | 15-20 reps |
| Patellar mobilization | 1 set | 15-20 reps |
| Hip abduction | 3 sets | 10 reps |
| Ankle pumps | 10 per hour | |
| Prone hang | 5 minutes |
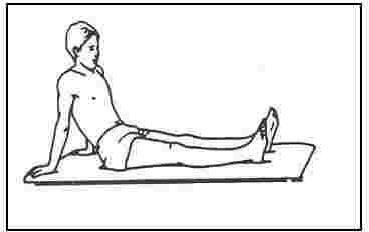
Quadriceps Setting
Lie or sit with knee fully straight. Tighten and hold the front thigh muscle making the knee flat and straight (this should make your knee flatten against the bed or floor). Hold 5 seconds for each contraction.
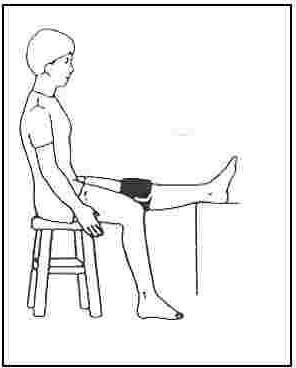
Heel Prop
Lie on your back with a rolled up towel under your heel, or sit in a chair with the heel on a stool. Let the knee relax into extension (straight). If the knee will not straighten fully, you can place a small weight (2-5 lbs) on the thigh just above the kneecap. Try to hold for 5 minutes. Try to practice quadriceps setting in this position.
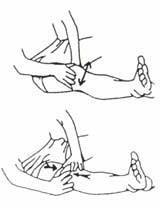
Patellar Mobilization
With the knee fully extended, grasp the edges of your kneecap between your thumb and index finger. Move the kneecap side to side and up and down.
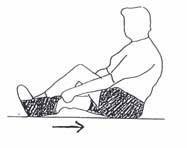
Heel slides with towel assist
While sitting or lying on your back, actively slide your heel backward to bend the knee. Hold this bent position for five seconds then slowly relieve the stretch and straighten the knee. While the knee is straight, you may repeat the quadriceps setting exercise. You can assist by using a towel to pull your heel back.
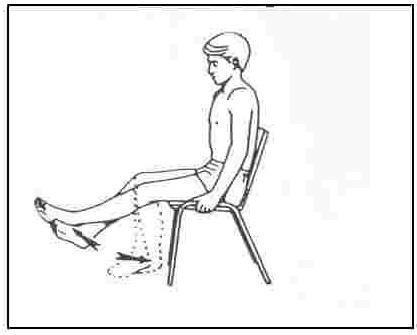
Sitting Heel Slides
While sitting in a chair or over the edge of the bed, support the operated leg with the uninvolved leg. Lower the operated leg, with the unoperated leg controlling, allowing the knee to bend. Do not go past 60° of bend at the knee. Hold for 5 seconds and slowly relieve the stretch by lifting the foot upward with the uninvolved leg to the straight position.
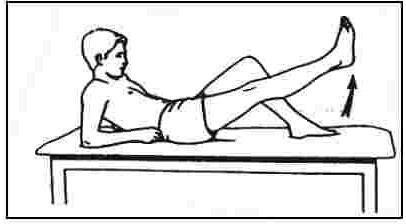
Straight leg lift
Tighten the quadriceps as much as you can. Lift your heel 4-6 inches from the floor. Tighten the quadriceps harder. Lower your leg back to the floor while continuing to tighten the quadriceps. If your knee bends when you attempt to lift do not do this exercise.
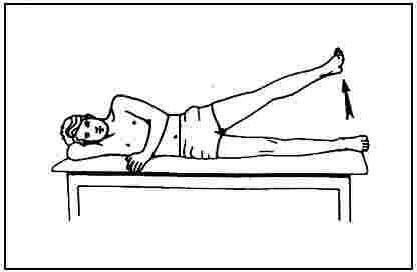
Hip abduction
Lie on your unoperated side. Keep your knees fully extended (straight). Raise the operated limb upward to a 45° angle. Hold for one second then lower slowly.
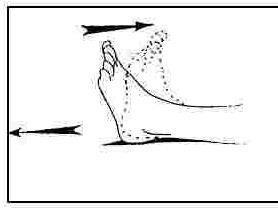
Ankle Pumps
Move the ankle up and down to help stimulate circulation in the leg.
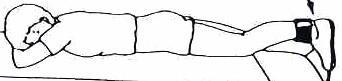
Prone Hang
Lie face down across your bed so that the kneecap is just off the edge of the mattress. Let your leg drop down toward the floor so that your knee straightens fully. If the knee will not fully extend, then attach a weight around the ankle to help pull the leg down. Use an amount of weight as described in the heel prop exercise.
Phase II: Early rehabilitation phase (weeks 2-6 after surgery)
Goals
- Maintain full passive knee extension (at least 0-5° of hyperextension)
- Gradually increase knee flexion
- Diminish swelling and pain
- Muscle control and activation
- Restore proprioceptive and neuromuscular control
- Normalize patellar mobility
- Normal gait without crutches (if autograft)
Activities
- Continue to use ice to decrease swelling. It should be used for 20 minutes at least three times per day.
- Brace/crutches: Typically if no other injuries were fixed during your surgery, you can begin to ween off of your crutches at home around week 2 provided you continue to wear the brace and have signs of activation of your quadriceps muscles.
- You will follow-up with Dr. Ford around 10-14 days after your surgery.
Exercises
You will continue the earlier exercises, both in PT and at home. The harder you work at home, the faster you will return to normal activities. Additionally, if you did not have a meniscus repair, you may begin to do leg press and hamstring extension exercises on a machine under the supervision of your therapist. You need to have achieved the following, though, in order to do this:
- Full passive knee extension
- Full extension while quadriceps setting
- Flexion of 125 degrees
- Minimal swelling
Phase III: Progressive strengthening and neuromuscular control phase (weeks 6-12 after surgery)
Goals
- Restore full knee range of motion (0-125°)
- Improve lower extremity strength
- Enhance proprioception, balance and neuromuscular control
- Improve muscular endurance
- Restore limb confidence and function
- Protect the reconstruction (avoid falling)
Activities
- The brace can be discontinued after you see Dr. Ford at your 6-week visit. Concentrate on walking with a heel to toe gait without a limp. In some cases, use of the brace will continue if your knee requires a longer period of protection.
- You are clear to drive when bearing weight on your operative leg is comfortable and you have good control of the leg. If your left leg was operated on, driving may have been allowed earlier, however please discuss this with Dr. Ford.
Precautions When Exercising
- Avoid pain at the patellar tendon site
- Avoid pain and/or crepitus at the patella
- Build up resistance and repetitions gradually
- Perform exercises slowly avoiding quick direction change and impact loading
- Exercise frequency should be 2 to 3 times a week for strength building
- Be consistent and regular with the exercise schedule
Exercises
Range of motion/strengthening:
- Quadriceps setting
- Heel prop
- Prone hang
- Heel slides with towel assist
- Straight leg raises
- Standing hamstring curl
- Standing toe-raises- single leg
- Hip abduction
- Squat to chair
- Wall slides
- Single leg strengthening progression
Stretching exercises:
- Hamstring stretch, 3-5 reps holding 15 to 30 seconds
- Quadriceps stretch, 3-5 reps holding 15 to 30 seconds
- Calf stretch, 3-5 reps holding 15 to 30 seconds
Optional exercises:
- Seated Leg Press
- Roman Chair
- Hamstring Curl
- Calf Raise Machine
- HIP Abductor/Adductor Machine
- Hip Flexor Machine
Cardiovascular conditioning can begin at this phase:
- Stationary bicycle
- Walking
- Rowing
- Elliptical trainer
- Water workout
DO NOT perform any of the following exercises:
- Knee extension weightlifting machine
- Jumping
- Step exercises with impact
- Pivoting or cutting
Phase IV: Advanced activity phase (weeks 12-16 after surgery)
Goals
- Normalize lower extremity strength
- Enhance muscular power and endurance
- Improve neuromuscular control
- Perform selected sport-specific drills
Criteria to progress to Phase IV
- AROM 0-135°
- Quad strength 75% contralateral side
- Knee extensor: flexor ratio 70-75%
- No pain or effusion
- Satisfactory clinical exam
- Hop test 80% of contralateral leg
Activities
- Your activities will increase in this phase of rehab, however it is important to remember that you are not yet fully recovered from your surgery. Progressing too quickly or engaging in sports or other activity prior to being cleared to do so greatly increases the risk of failure of your surgery and compromise of your results.
- At this time, light running on a soft level surface with a sports brace can begin if Dr. Ford advises. You need to have full range of motion, good strength and no swelling to run safely. If you run, 3 times per week for 10 minutes is advisable for the first 2 weeks. If there is no pain or swelling, you can increase your running time by 1 minute per session for a maximum of 30 minutes. Walking and hiking on gentle trails can also be used for conditioning activity.
- Avoid the following exercises as they place undue stress on your knee:
- Leg extension machine
- Stairmaster or stair climber machines
- Deep knee lunges or squats past 90º of knee flexion
- High impact exercises
- Avoid pain at the patellar tendon site, as well as crepitus (crunching) at the patella
- Build up resistance and repetitions gradually
- Perform exercises slowly and avoid quick direction changes
- Avoid impact loading
- Exercise frequency should be at least 2-3 times per week for strength building
Exercises
- May initiate straight ahead running program
- Light sports okay (golf – pitch and putt)
- Continue strengthening drills: Leg press, Wall squats, Hip abduction and adduction, Hip flexion and extension, Knee extension 90-40, Hamstring curls, Seated and standing toe calf raises, Step down, Lateral step ups and lunges
- Weeks 14-16 may initiate lateral agility drills and backward running.
- It is okay to start jump and plyometric training.
Neuromuscular training:
- Lateral step overs (cones)
- Lateral lunges
- Tilt board drills
- Sports RAC repositioning on tilt board
Phase V: return to activity phase (weeks 16-24 after surgery)
Goals
- Gradual return to full-unrestricted sports
- Achieve maximal strength and endurance
- Normalize neuromuscular control
- Progress skill training
Criteria to enter Phase V
- Full ROM
- Quadriceps bilateral comparison within 80% or greater
- Hamstring bilateral comparison within 110% or greater
- Quadriceps torque: body weight ratio 55% or greater
- Hamstrings: quadriceps ratio 70% or greater
- Proprioceptive test 100% of contralateral leg
- Functional test 85% or greater of contralateral leg
Exercises
- Continue strengthening exercises
- Continue neuromuscular control drills
- Continue plyometric drills
- Progress running and agility program
- Progress sport specific training: Running/cutting/agility drills, Gradual return to sport drills
Return to full sport is typically 9-12 months based upon balanced muscle strength in your quadriceps and hamstrings. Certain contact sports and positions played (such as soccer) may dictate a different return timeline than others. It is important that you, your therapist, and Dr. Ford discuss these variables to ensure your highest chance of success.