MENISECTOMY (MENISCUS TRIMMING)
The meniscus is a C-shaped piece of cartilage in the knee that acts like a cushion and shock absorber between the thigh bone (femur) and shin bone (tibia). Each knee has two menisci: one on the inside of the knee (medial meniscus) and one on the outside (lateral meniscus).
The knee also contains another type of cartilage called articular cartilage. This is the smooth covering on the ends of the bones that helps the knee move easily with very little friction.
Over time, normal wear and tear or a sudden injury can cause these cartilages to tear, leading to knee pain. Meniscus or cartilage tears may also cause swelling, and sometimes symptoms such as popping, grinding, buckling, or the knee getting “stuck” or locking.
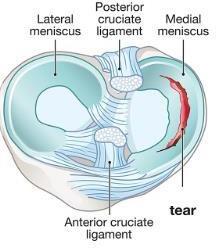
A majority of meniscus tears can be successfully treated with non-surgical options such as physical therapy, anti-inflammatory medications, activity modifications or even injections. However, in a certain subset of patients, the symptoms of locking, catching, and a feeling that the knee is going to give out with twisting or turning, may lead to the need for a surgical discussion with Dr. Ford.
When surgery to repair the torn cartilage is to be performed, it can be done by either removing the torn piece that is causing the symptoms or repairing with suture. The location of the tear and a patients age (generally under 35-40 years of age) will dictate if a repair is performed or if the tear will be best served through excision of the torn segment.
The meniscus gets its blood supply from the outside of the knee toward the inside of the knee. If there is a tear of the meniscus in a region with good blood supply (toward the outside of the knee), and the tear is of an appropriate size and there is not too much advanced arthritis the meniscus can be repaired rather than removed.
A meniscus repair is a procedure used to fix a torn meniscus by stitching the torn pieces back together. The stitches are placed inside the knee and are usually left there permanently.
The goal of repairing the meniscus is to preserve the knee’s natural shock absorber. Keeping as much healthy meniscus tissue as possible may help protect the knee joint and lower the risk of developing arthritis in the future.
The risks of meniscus repair surgery include but are not limited to:
- Infection
- Bleeding
- Excessive swelling
- Blood clots
- Joint stiffness
- Pain, postoperative and/or persistent
Meniscus repair may fail as often as 20% of the time, leading to the need to perform additional surgery to remove the sutures and the meniscus

Postoperative Instructions
- Please call with any concerns: (856)-751-5100.
- Apply ice to the knee, as it will be quite helpful. After two days, you can change the dressing to a smaller one to allow the cold to better get to the knee
- After two days it is okay to shower and get the wound wet, but do not soak the wound as you would in a bath tub or hot tub.
- After knee surgery there is a variable amount of pain and swelling. This will dissipate after several days. Continue to take the Tylenol and over the counter anti-inflammatory medications (Alleve, Motrin etc) if you are allowed to. If you notice calf pain or excessive swelling in the lower leg, call your doctor.
- It is important to look out of signs of infection following surgery. These can include: fever (temperature >101.5°) chills, nausea, vomiting, diarrhea, redness around your incision, or yellow or green drainage from your incision. Should any of these be present please contact Dr. Ford’s office immediately.
- You will have crutches or a cane after surgery, but a brace is NOT required. It is important to use these as directed in the rehabilitation protocol (see below).
- You will have an office visit scheduled approximately 10-14 days after your surgery.
Phase I: Maximum protection phase (Weeks 1-2)
Goals
- Control pain and swelling
- Initiate knee movement
- Activate quadriceps muscles
Activities
- You are allowed to straighten and bend your knee as much as your body allows.
- You will go home with crutches or a cane for 1-2 days as needed. You can bear weight as tolerated.
- Apply cold to reduce pain and swelling. Use ice on the knee 20 minutes/on and 20 minutes/off for the first day when awake. Then apply cold as often as needed for 15 to 20 minutes at a time for the next several days. Place a towel or cloth between the skin and the ice to prevent skin injury.
- Take an aspirin each morning for the first two weeks if you are over the age of 18 to help prevent blood clots.
- You should have an appointment to see physical therapy by 5 days. You will see Dr. Ford in 10-14 days.
Stage I Exercises: week 1 (prior to starting PT)
Program: 7 days per week, 3-4 times per day.
| Quadriceps setting | 1-2 sets | 15-20 reps |
| Heel prop | 5 minutes | |
| Heels slides with towel assist | 5-15 minutes | |
| Sitting heel slides | 1-2 sets | 15-20 reps |
| Ankle pumps | 10 per hour |
Exercises
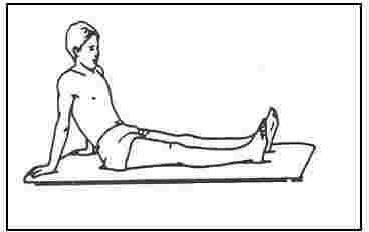
Quadriceps Setting
Lie or sit with knee fully straight. Tighten and hold the front thigh muscle making the knee flat and straight (this should make your knee flatten against the bed or floor). Hold 5 seconds for each contraction.
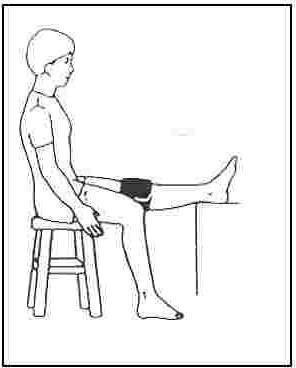
Heel Prop
Lie on your back with a rolled up towel under your heel, or sit in a chair with the heel on a stool. Let the knee relax into extension (straight). If the knee will not straighten fully, you can place a small weight (2-5 lbs) on the thigh just above the kneecap. Try to hold for 5 minutes. Try to practice quadriceps setting in this position.

Heel slides with towel assist
While sitting or lying on your back, actively slide your heel backward to bend the knee. Hold this bent position for five seconds then slowly relieve the stretch and straighten the knee. While the knee is straight, you may repeat the quadriceps setting exercise. You can assist by using a towel to pull your heel back.
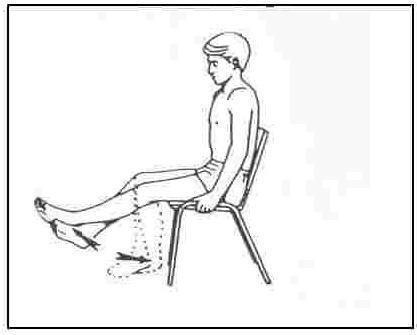
Sitting Heel Slides
While sitting in a chair or over the edge of the bed, support the operated leg with the uninvolved leg. Lower the operated leg, with the unoperated leg controlling, allowing the knee to bend. Do not go past 60° of bend at the knee. Hold for 5 seconds and slowly relieve the stretch by lifting the foot upward with the uninvolved leg to the straight position.
Phase II: Weeks 2 through 6
In addition to demonstrating these exercises, your therapist will give you a home exercise program. It will be important to perform these exercises daily in order to ensure maximum results after your surgery. Remember to adhere to your precautions in order to maximize your results.
Goals
- Protect the knee from overstress and allow healing
- Regain knee motion, but limit flexion to 90 degrees
- Begin muscle strengthening
Activities
Exercises
- Range of motion: You can fully extend (straighten) and flex (bend) your knee.
- Use ice as needed for any swelling or pain.
Strengthening exercises
- Multi-angle quad isometrics
- SLR (all 4 planes)
- Knee extension 90-0 degrees
- CKC mini-squats 0-45 degrees
- CKC wall squats
- CKC weight shifts (diagonal)
- Balance training (cup walking)
- Bicycle (once ROM appropriate)
*Avoid twisting, deep squatting and stooping
*Avoid hamstring curls
Progressively increase ROM to full physiologic motion (0-135+/- degrees). Continue to focus on painless stretching.
Phase III: 6-12 weeks after surgery
Goals
- Continue full-weight bearing
- Regain full motion
- Regain full muscle strength
Activity
- You can bear weight and walk on the leg as much as you are able. Try to avoid limping and walk with a heel – toe pattern. Avoid squatting or pivoting on the operated knee.
- You can begin to gradually increase the range of motion of the knee past 90 degrees. You may discontinue use of the brace.
- Continue to ice the knee to reduce pain and swelling. Ice the knee three times a day for 15 to 20 minutes. Always place a towel or cloth between the skin and the ice to prevent skin injury.
Exercises
Continue ROM and stretching to maintain 0-135 degrees
Progress strengthening exercises
- Leg press 70-0 degrees
- Knee extension 90-40 degrees
- Hip Abduction/Adduction
- Wall squats 0-70 degrees
- Vertical squats 0-60 degrees
- Lateral step-ups
- Front and lateral lunges
- Hamstring curls
- Balance/proprioception training
- Biodex stability
- Squats rocker board
- Cup walking (step overs)
- Standing on foam single leg
- Bicycle (if ROM permits)
- Pool program (may begin running in pool)
Phase IV: Return to activity (Week 12 and beyond)
Goals
- Regain muscle strength
- Work on cardiovascular conditioning
- Initiate sports-specific training
Criteria to progress to Phase IV
- Full non-painful ROM
- No pain or tenderness
- Satisfactory clinical exam
- Satisfactory isokinetic test
Exercises
Continue and progress all strengthening exercises and stretching drills
Deep squatting permitted at 3 months
- Initiate straight line running: 2-3 months
- Initiate pivoting and cutting: 2-3 months
- Initiate agility training: 3-4 months
- Gradually return to sports: 3-4 months